How to Build Your Own Image Recognition API?
Tips and tricks for developing and improving your custom image recognition models and deploying them as API with the Ximilar platform.


Image recognition systems are still young, but they become more available every day. Usually, custom image recognition APIs are used for better filtering and recommendations of products in e-shops, sorting stock photos, classification of errors, or pathological findings. Ximilar, same as Apple Vision SDK or Google Tensorflow, make the training of custom recognition models easy and affordable. However, not many people and companies have been using this technology to its full potential so far.
For example, recently, I had a conversation with a client who said that Google Vision didn’t work for him, and it returned non-relevant tags. The problem was not the API but the approach to it. He employed a few students to do the labelling job and create an image classifier. However, the results were not good at all. After showing him our approach, sharing some tips and simple rules, he got better classification results almost immediately. This post should serve as a comprehensive guide for those, who build their own image classifiers and want to get the most out of it.
How to Begin
Image recognition is based on the techniques of machine learning and computer vision. It is able to categorize and tag images with tags describing the attributes recognized in them. You can read everything about the service and its possibilities here.
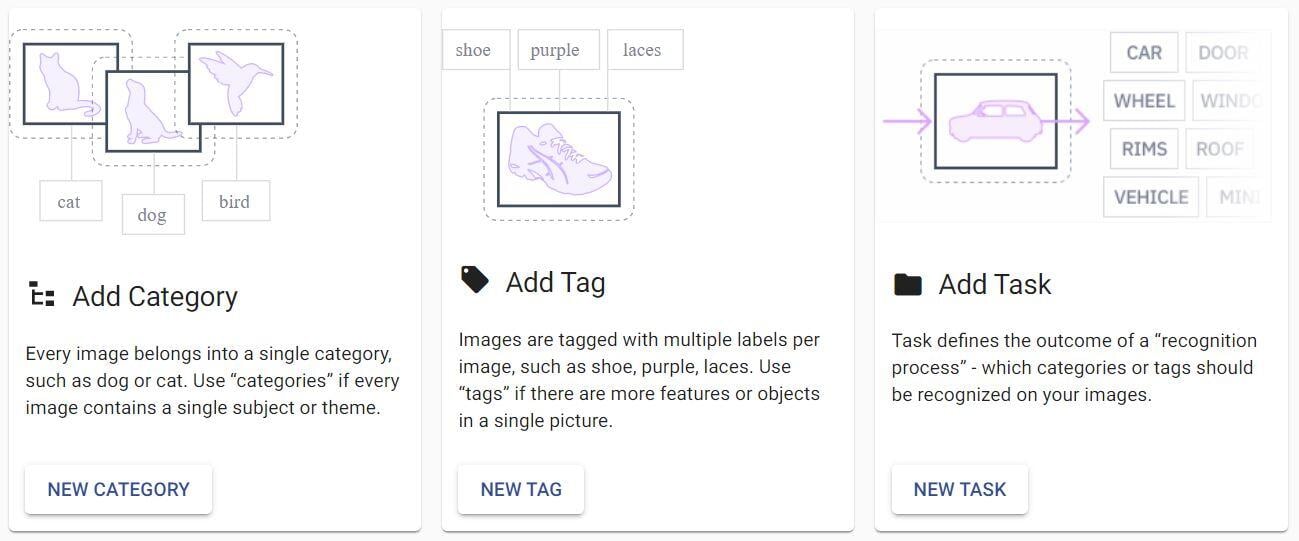
To train your own Image Recognition models and create a system accessible through API, you will first need to upload a set of training images and create your image recognition tasks (models). Then you will use the training set to train the models to categorize the images.
If you need your images to be tagged, you should upload or create a set of tags and train tagging tasks. As the last step, you can combine these tasks into a Flow, and modify or replace any of them anytime due to its modular structure. You can then gradually improve your accuracy based on testing, evaluation metrics and feedback from your customers. Let’s have a look at the basic rules you should follow to reach the best results.
The Basic Rules for Image Recognition Models Training
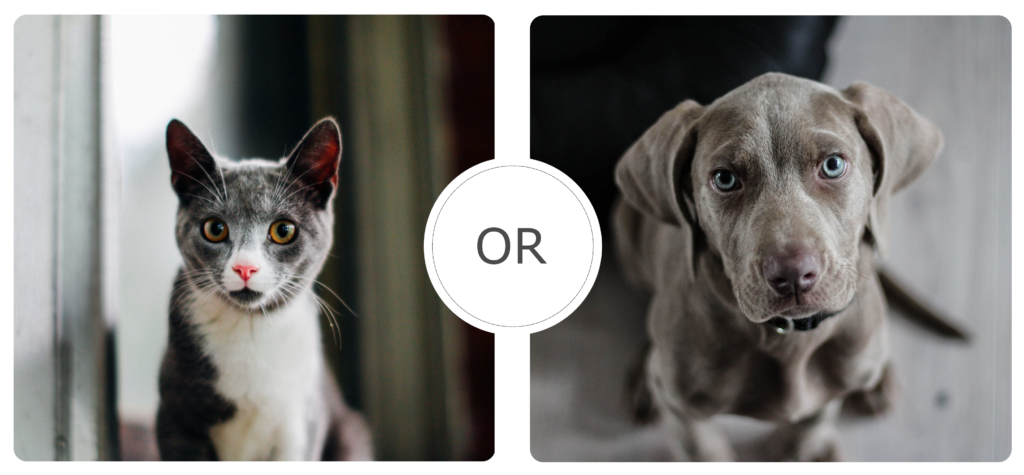
Each image recognition task contains at least two labels (classes, categories) – e.g., cats and dogs. A classic image recognition model (task) assigns one label to each image – so the image is either a cat or dog. In general, the more classes you have, the more data you will need to teach the neural network to predict labels.
The training images should represent the real data that will be analyzed in a production setting. For example, if you aim to build a medical diagnostic tool helping radiologists identify the slightest changes in the lung tissue, you need to assemble a database of x-ray images with proven pathological findings. For the first training of your task, we recommend sticking to these simple rules:
- Start with binary classification (two labels) – use 50–100 images/label
- Use about 20 labels for basic and 100 labels for more complex solutions
- For well-defined labels use 200+ images/label
- For hard to recognize labels add 100+ images/label
- Pattern recognition – for structures, x-ray images, etc. use 50–100 images/label
Always keep in mind, that training one task with hundreds of labels on small datasets almost never works. You need at least 20 labels and 100+ images per label to start with to achieve solid results. Start with the recommended counts, and then add more if needed.
The Difference Between Testing & Production
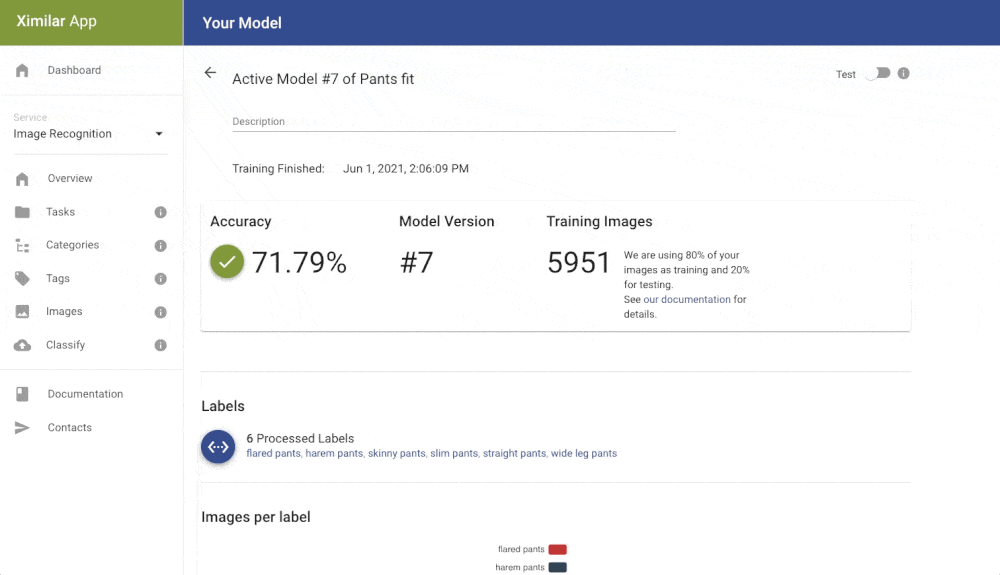
The users of Ximilar App can train tasks with a minimum of 20 images per label. Our platform automatically divides your input data into two datasets – training & test set, usually in a ratio of 80:20. The training set is used to optimize the parameters of the classifier. During the training, the training images are augmented in several ways to extend the set.
The test data (about 20 %) are then used to validate and measure accuracy by simulating how the model will perform in production. You can see the accuracy results on the Task dashboard in Ximilar App. You can also create an independent test dataset and evaluate it. This is a great way to get accurate results on a dataset that was not seen by the model in the training before you actually deploy it.
Remember, the lower limit of 20 images per label usually leads to weak results and low accuracy. While it might be enough for your testing, it won’t be enough for production. This is also called overfitting. Most of the time the accuracy in Ximilar is pretty high, easily over 80 % for small datasets. However, it is common in machine learning to use more images for more stable and reliable results in production. Some tasks need hundreds or thousands of images per label for the good performance of your production model. Read more about the advanced options for training.
The Best Practices in Image Recognition Training
Start With Fewer Categories
I usually advise first-time users to start with up to 10 categories. For example, when building an app for people to recognize shoes, you would start with 10 shoe types (running, trekking, sneakers, indoor sport, boots, mules, loafers …). It is easier to train a model with 10 labels, each with 100 training images of a shoe type, than with 30 types. You can let users upload new shoe images. This way, you can get an amazing training dataset of real images in one month and then gradually update your model.
Use Multiple Recognition Tasks With Fewer Categories
The simpler classifiers can be incredibly helpful. Actually, we can end up with more than 30 types of shoes in one model. However, as we said, it is harder to train such a model. Instead, we can create a system with better performance if we create one model for classifying footwear into main types – Sport, Casual, Elegant, etc. And then for each of the main types, we create another classifier. So for Sport, there will be a model that classifies sports shoes to Running shoes, Sneakers, Indoor shoes, Trekking shoes, Soccer shoes, etc.
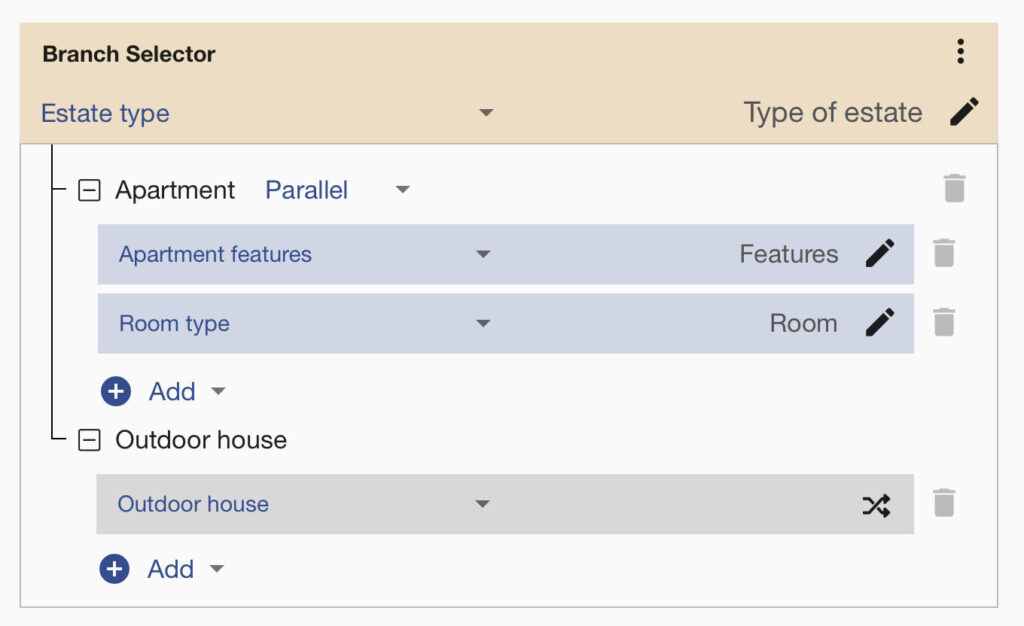
Use Binary Classifiers for Important Classes
Imagine you are building a tagging model for real estate websites, and you have a small training dataset. You can first separate your images into estate types. For example, start with a binary classifier that separates images to groups “Apartment” and “Outdoor house”. Then you can train more models specifically for room types (kitchen, bedroom, living room, …), apartment features, room quality, etc. These models will be used only if the image is labelled as “Apartment”.
You can connect all these tasks via the Flows system with a few clicks. This way, you can chain multiple image recognition models in one API endpoint and build a powerful visual AI. Typical use cases for Flows are in the e-commerce and healthcare fields. Systems for fashion product tagging can also contain thousands of labels. It’s hard to train just one model with thousands of labels that will have good accuracy. But, if you divide your data into multiple models, you will achieve better results in a shorter time! For labelling work, you can use our image Annotation system if needed.
Choose Your Training Images Wisely
Machine learning performs better if the distribution of training and evaluated pictures is even. It means that your training pictures should be very visually similar to the pictures your model will analyze in a production setting. So if your model will be used in CCTV setting, then your training data must come from CCTV cameras. Otherwise, you are likely to build a model that has great performance on training data, but it completely fails when used in production.
The same applies to Real Estate and other fields. If the system analyzes images of real estate that were not made only by professional photographers, then you need to include photos from smartphones, with bad lighting, blurry images, etc.

Improving the Accuracy of the System
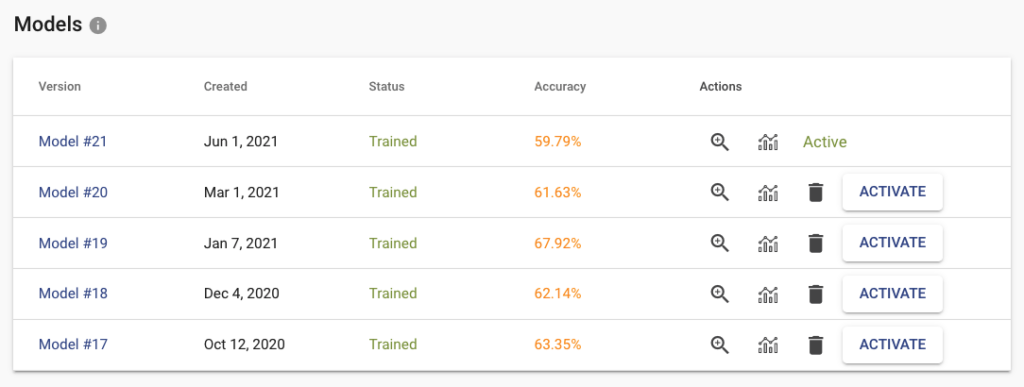
When clicking on the training button on the task page, the new model is created and put in the training queue. If you upload more data or change labels, you can train a new model. You can have multiple versions of them and deploy to the API only specific version that works best for you. Down on the task page, you can find a table with all your trained models (only the last 5 are stored). For each trained model, we store several metrics that are useful when deciding which model to pick for production.
Inspect the Results and Errors
Click on the zoom icon in the list of trained models to inspect the results. You can see the basic metrics: Accuracy, Recall, and Precision. Precision tells you what is the probability that the model is right if it predicts a specific label. Recall tells you how likely is the prediction correct. If we have high recall but lower precision for the label “Apartment” from our real estate example, then the model is probably predicting on every image that it is “Apartment” (even on the images that should be “Outdoor house”). The solution is probably simple – just add more pictures that represent “Outdoor house”.
The Confusion matrix shows you which labels are easily confused by the trained model. These labels probably contain similar images, and it is therefore hard for the model to distinguish between them. Another useful component is Failed Images (misclassified) that show you the model’s mistake on your data. With Failed images, you can also see labelling mistakes in your data and fix them immediately. All of these features will help you build a more reliable model with good performance.
Reliability of the Image Recognition Results
Every client is looking for reliability and robustness. Stay simple if you aim to reach high accuracy. Build models with just a few labels if you can. For more complex tagging systems use Flows. Building an image classifier with a limited number of training images needs an iterative approach. Here are a few tips on how to achieve high accuracy and reliable results:
- Break your large task into simple decisions (yes or no) or basic categories (red, blue and green)
- Make fewer categories & connect them logically
- Use general models for general categories
- Make sure your training data represent the real data your model will analyze in production
- Each label should have a similar amount of images, so the data will be balanced
- Merge very close classes (visually similar), then create another task only for them, and connect it via Flows
- Use both human and UI feedback to improve the quality of your dataset – inspect evaluation metrics like Accuracy, Precision, Recall, Confusion Matrix, and Failed Images
- Always collect new images to extend your dataset
Summary for Training Image Recognition Models
Building an image classifier requires a proper task definition and continuous improvements of your training dataset. If the size of the dataset is challenging, start simple and gradually iterate towards your goal. To make the basic setup easier, we created a few step-by-step video tutorials. Learn how to deploy your models for offline use here, check the other guides, or our API documentation. You can also see for yourself how our pre-trained models perform in the public demo.
We believe that with the Ximilar platform, you are able to create highly complex, customizable, and scalable solutions tailored to the needs of your business – check the use cases for quality control, visual search engines or fashion. The basic features in our app are free, so anyone can try it. Training of image recognition models is also free with Ximilar platform. You are simply paying only for calling the model for prediction. We are always here to discuss your custom projects and all the challenges in person or on a call. If you have any questions, feel free to contact us.

Tags & Themes
Related Articles
The Ultimate Guide to LLM Fine-Tuning Platforms and Tools
The best LLM fine-tuning platforms and tools, from training and deployment to inspecting custom language models.
Vision Language Model Evaluation & Inspection Made Easy
From loss curves to GGUF exports – mastering your vision language model evaluation workflow with built-in metrics.

Fine-Tuning a Vision Language Model With the Ximilar API
Fine-tune your vision-language model with image understanding, run it on your own hardware, and cut your per-inference token costs.