 Product Description
  Price Search
  Combine LLMs & Vision
  Fine-tune & Deploy
  Instance Segmentation
 How to Build & Manage Instruction Datasets for LLM Fine-Tuning
A complete guide to creating high-quality instruction-tuning data for fine-tuning Large Language Models (LLMs) and Vision Language Models (VLMs).

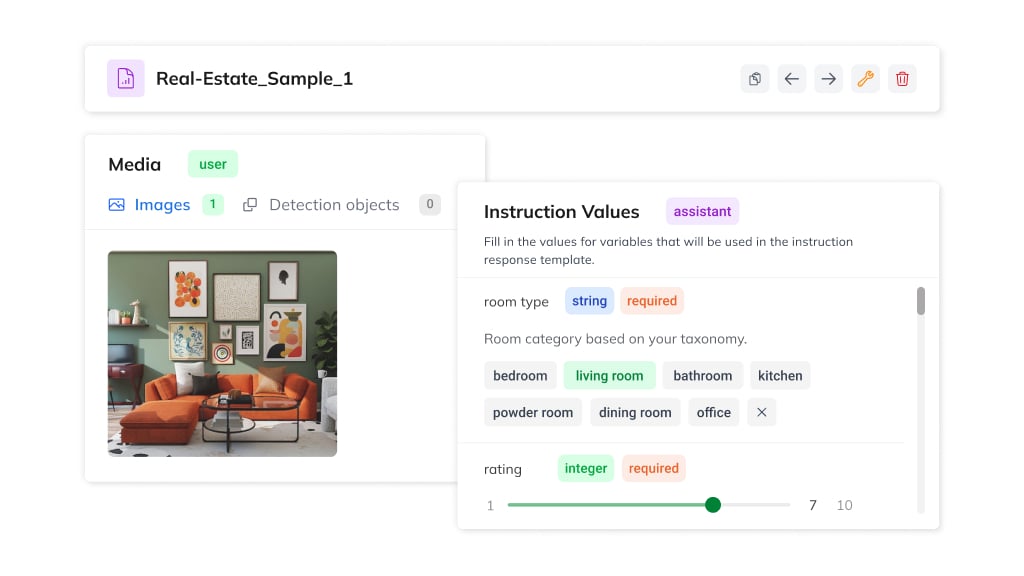
Today, we’ll look at how to build an instruction dataset for fine-tuning a Large Language Model manually through the Ximilar platform.
A high-quality dataset is the single biggest factor in how well your fine-tuned model performs – and it’s also the part most teams underestimate. I will focus on giving you a structured, hands-on workflow to curate, manage, and continuously optimize the datasets behind your LLMs.
By the end, you’ll know how to turn raw examples into training-ready data – and why doing this well matters more than almost any other step in the fine-tuning process. You will also learn how to download this dataset offline.
Our Guides on LLM & VLM Building
This guide is the third in a series on building VLMs and LLMs. Here’s the full reading list:
- Start here: Fine-Tuning a Vision Language Model Without Writing Code – an intro to VLMs and our fine-tuning platform
- Guide #1: Fine-Tuning a VLM With the Ximilar API
- Guide #2: VLM Evaluation & Inspection Made Easy
- Also worth a look: Best Tools for Finetuning the LLMs – a broader platform comparison
What is an Instruction Dataset?
Instruction datasets – sometimes called instruct datasets for short – come in many forms. Well-known open-source examples like Alpaca and the Flan Collection set the standard instruction tuning format, used for natural language tasks such as summarization and question answering. Others focus specifically on instruction fine-tuning for general instruction following, while the HH-RLHF dataset added human feedback signals used in reinforcement learning.
Teams draw on many kinds of source material. Some use collections hosted in repositories on GitHub or HuggingFace, others parse text from Stack Overflow threads or a plain English dataset of forum posts, and some build a conversation corpus from multi-turn conversations found in chat logs.
Data quality sets the ceiling on model performance, no matter how much compute goes into training.
Unlike publicly available training data you download and reuse, this guide walks you through creating a dataset by hand, sample by sample, so every example matches your exact use case. Generic AI datasets available online won’t capture your specific schema, tone, or edge cases. High-quality data – and high-quality instruction data specifically – beats a large volume of mediocre examples every time. A small, carefully curated dataset consistently outperforms a noisy one.
I believe Ximilar offers one of the best ways to create and manage instruction datasets with your team effectively. There is simply no other product on the market that will help you with building your datasets for your LLMs like the Ximilar VLM platform.
Let’s Define a Dataset: Real Estate Property
Now let’s pick a simple example. In our previous blog post, we used a satellite image dataset from Hugging Face and uploaded it to the Ximilar platform automatically via the API. This time, we’ll look into a different field: let’s build a dataset for an AI agent that analyses real estate properties.
Given property images, the agent returns its approximate price, a description, the property type, the number of rooms, the room types, whether it’s furnished, and its overall condition.
An agent like this could plug directly into your own system for analysing and valuing properties at scale. Identifying the property type here is effectively a classification problem, just expressed through natural-language instructions instead of fixed labels.
This kind of specific task – teaching AI models to read images and return structured property data – is exactly what instruction datasets are built for. It’s a common principle across machine learning: data quality sets the ceiling on model performance, no matter how much compute goes into training.
First Steps
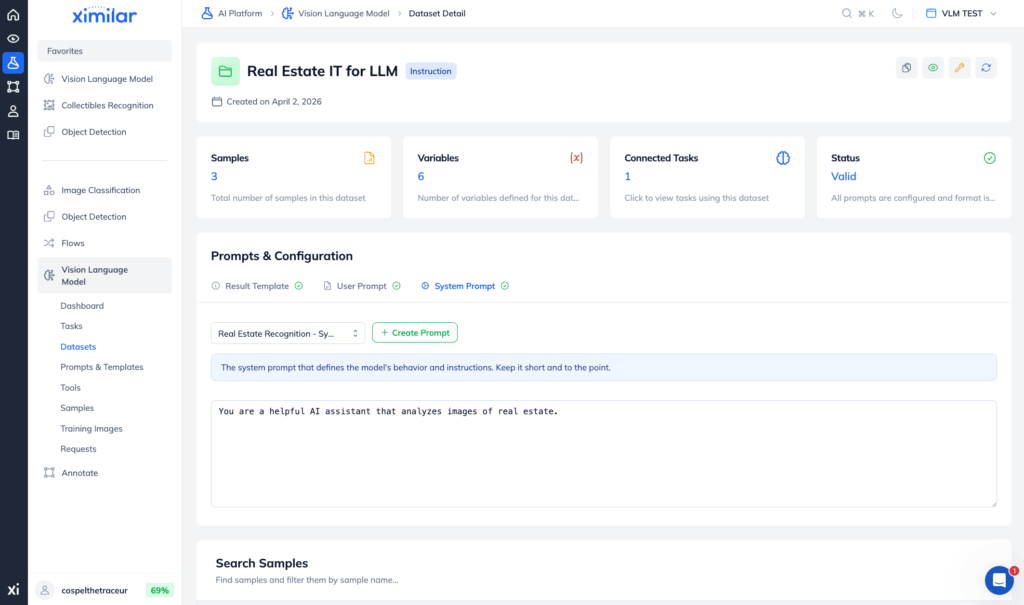
The first step is to log in via Ximilar App and go to Vision Language Model. Under Your Datasets, click on the Create Dataset tile, which will show you a modal asking whether you want to build an Instruction, Retrieval or an Agentic dataset.
For our use case, I will choose the Instruction dataset as it will help us to define the structure of the prompts and the template output that we expect from the model. Let’s name the dataset “Real Estate IT for LLM”.
Writing the System and User Prompts
First, let’s create a System Prompt:
You are a helpful AI assistant that analyzes images of real estate.Then the User Prompt, which contains two dynamic variables (location and square_meters) that can be filled when querying the model:
Analyze the provided real estate image(s).

0. Propose the title
1. Estimate the price of the estate
2. Identify the property type (House, Apartment, Commercial or Land)
3. A short description (max 3-4 sentences)
4. Number of rooms
5. Evaluate the overall condition of the property (New, Good, Fair, and Needs renovation)
6. Tell us whether its furnished or not

The real estate additional info:
{"location": "{{location}}", "square_meters": {{square_meters}}}

Return the result in the following JSON format only:
{"title": string, "price": float, "property_type": string, "number_of_rooms": integer, "furnished": string, "condition": string, "description": string}
 Do not include any additional text outside the JSON.
Defining the Result Template
The Result Template defines the exact structure you want your model to learn to generate. You can use any dataset format that fits your needs – JSON, YAML, XML, CSV, or plain text.
Each {{variable}} in double curly brackets is a placeholder for a value the model will fill in, and every variable you define has a type (float, text, boolean, and so on). These types do double duty: they keep your training and testing samples consistent when creating an instruction dataset, and they let Ximilar evaluate your model’s output accurately once you train it.
Our Result Template will be:
{
  "title": {{title}},
  "price": {{price}},
  "property_type": "{{property_type}}",
  "number_of_rooms": {{number_of_rooms}},
  "furnished": "{{furnished}}",
  "condition": "{{condition}}",
  "description": "{{description}}"
}
Now, click + Add Variable and create one variable for each placeholder in the Result Template. The names must match the template exactly: in my case price, property_type, number_of_rooms, furnished, condition, and description. Once you’ve added them all, your dataset configuration should look like this:
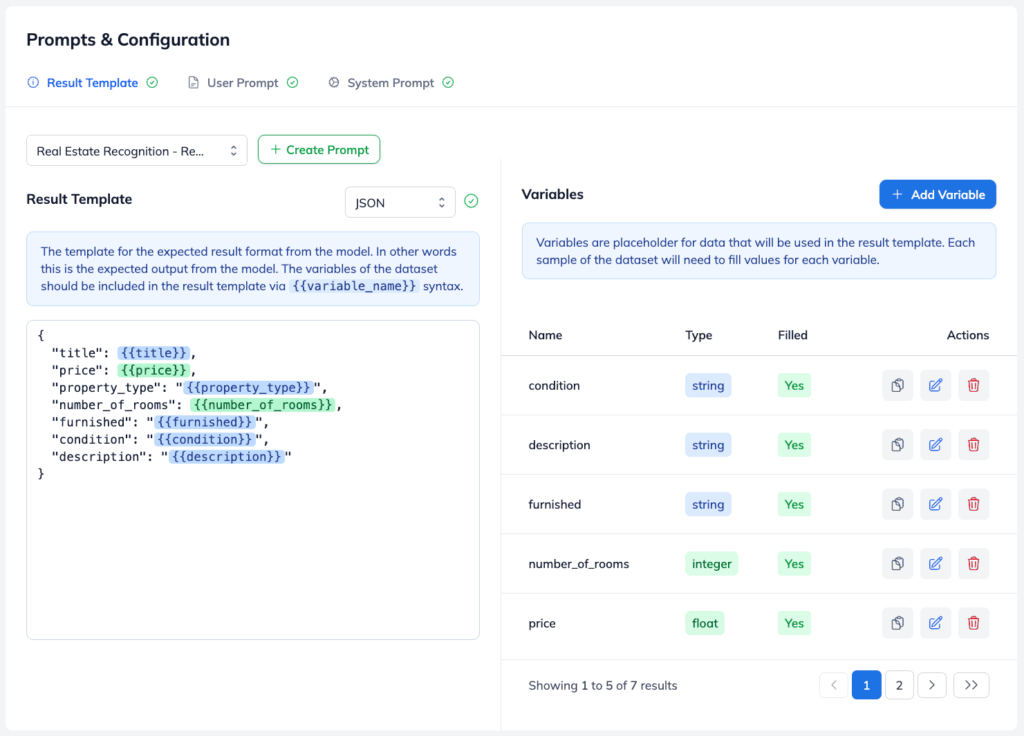
I set up several choices for the condition variable: New, Good, Fair, and Needs renovation. Same for the property_type where the model should predict one of House, Apartment, Commercial or Land. The number_of_rooms is a variable that is restricted between 1 and 10.
Instruction Samples for Training Your LLM
Now that our dataset is defined, let’s build our first sample for this dataset. Once you understand how it works, you can also create samples via the API. But if you want to review and manually verify each one, Ximilar gives you a great way to do it by hand.

Some teams speed up dataset generation with a synthetic data generation process – using LLMs to generate instruction data automatically instead of writing every sample by hand. Ximilar’s workflow instead keeps a human in the loop. You write and maintain data yourself, verifying each sample before it enters your dataset.
Creating a New Sample
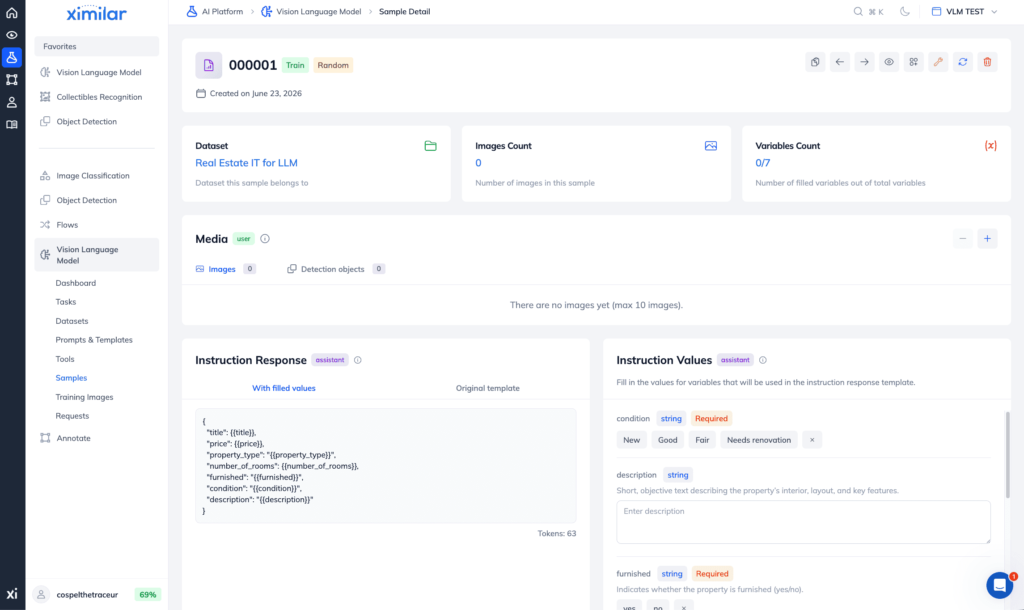
Scroll down on the dataset page and, in the table, click + Create New Sample. Give it a name – I’d recommend a unique identifier so you can search for it later. In this case, my identifier is 00001. Click Create, and you’ll be redirected to the Sample View.
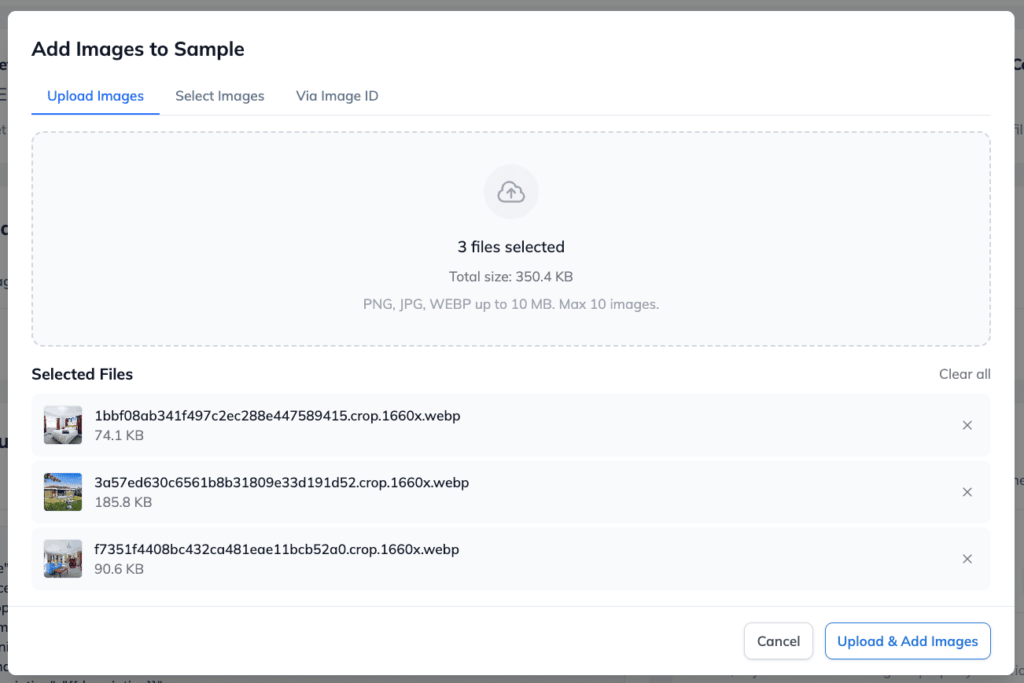
The Sample View has several sections: header, info panels, media, instruction response + values, instruction, system prompt, and metadata. Let’s start with the Media section – click the “+” button in the top-right corner to add images.
A modal window will open where you can either drag and drop images, upload them traditionally, or choose existing images from your workspace – manually from a gallery, or by entering their image IDs – to add to this sample.
Filling In the Sample Details
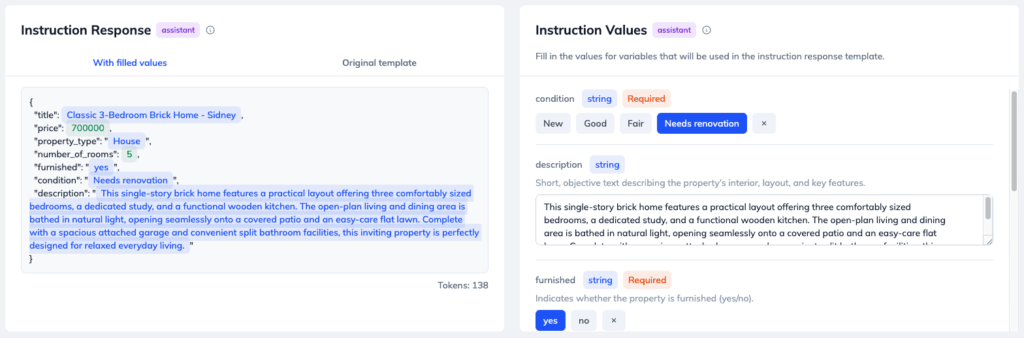
Below, you’ll find the Instruction Response and Instruction Values. These contain inputs based on the Result Template and variables defined in your Dataset configuration. If your dataset isn’t configured correctly, please return to the Dataset view to set up your template and variables.
The Instruction Response represents exactly what we want the model to generate. Please fill in each property field carefully and double-check your work before moving on. Every sample becomes an instruction-response pair that feeds directly into your fine-tuning run. You will notice that the UI displays elements dynamically based on your variable data types. This allows you to select the condition and property_type from predefined values rather than typing them manually, making the annotation process much faster.
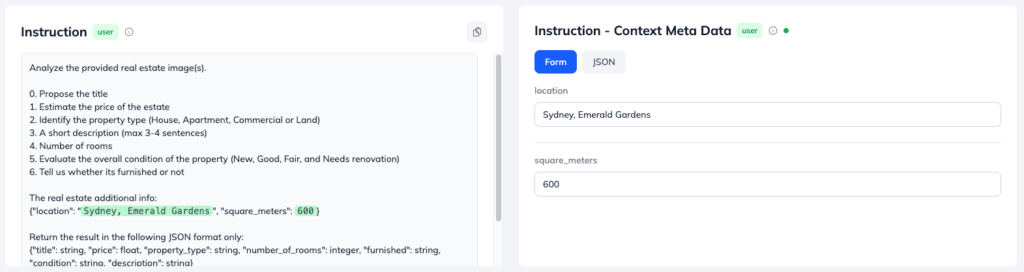
We also need to fill in the location and square meters for our instruction. These placeholders were inserted into our user prompt, so they’re ready for you to complete. During the training, this instruction with filled values (Context Meta Data) is used to query the model. Here, we’ll enter “Sydney, Emerald Gardens” for the location and “600” for the square meters. After the model is trained, you can fill your real values into a similar prompt.
Finally, in the header, you can flag whether this sample belongs to the Training or Testing set. This is how you split a training dataset from a separate evaluation set.
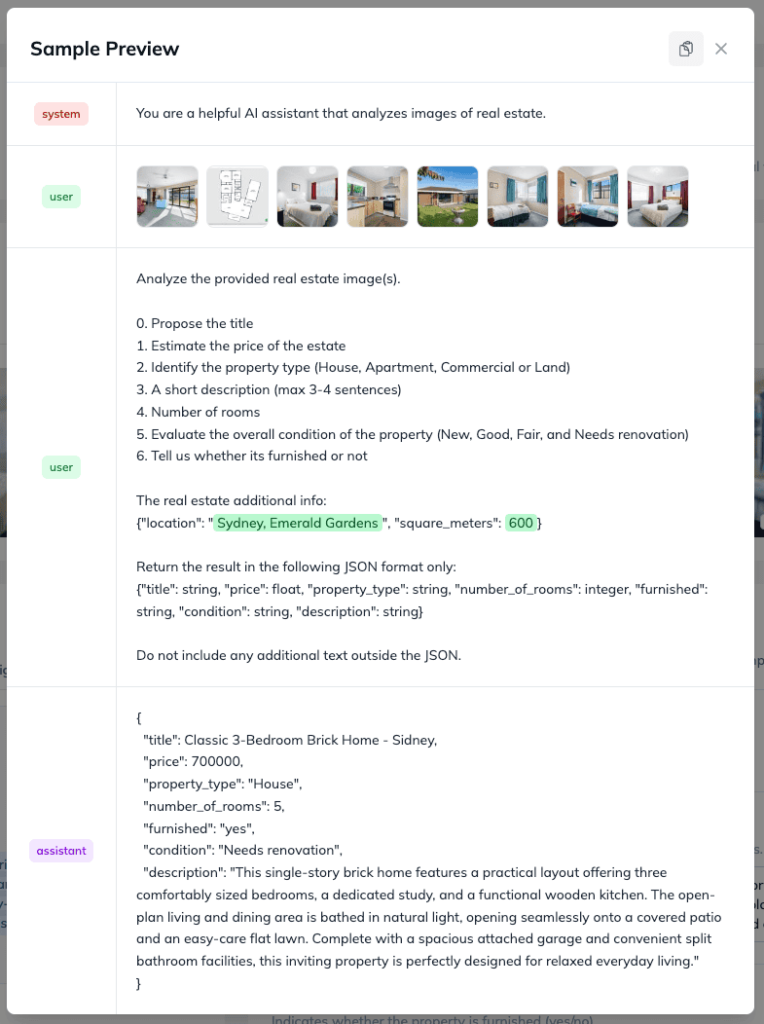
If you will use the Ximilar platform to train a VLM/LLM model, it will automatically divide the datasets based on this flag. It will also do an evaluation on both your training and test sets. Once we have filled everything, we can click on the eye icon in the header and see the full preview of the sample.
Dataset View
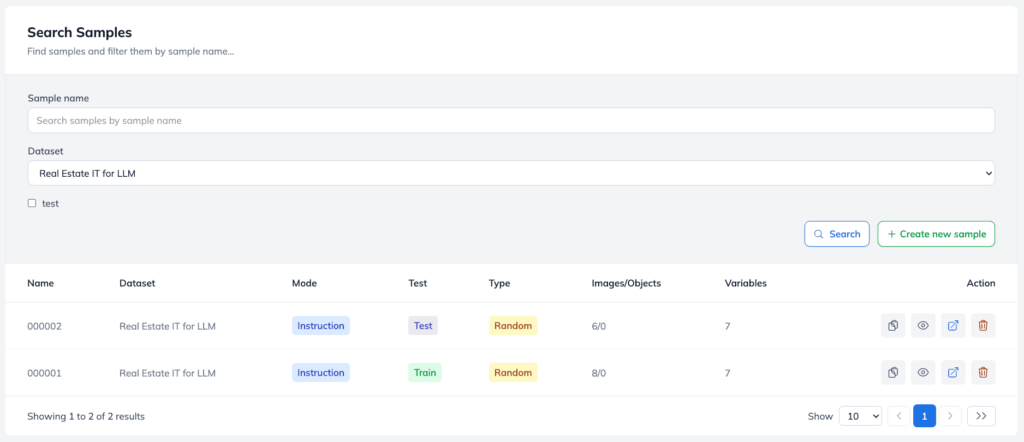
Now you can head back to the Dataset view to see all your samples. At the bottom, you’ll find a Search Samples table. This search form lets you:
- Search and quickly preview any sample
- Check whether you filled in every template variable
- Filter for test samples
- Update or delete samples
- See how many images each sample contains
Export Your Instruction Dataset for Fine-Tuning LLMs
Of course, all of this is being done so we can prepare our datasets for LLM fine-tuning. The question is how we can now download our samples for the dataset. For this purpose, we prepared a simple script for you that you can run via Python and our SDK client. The command to get your samples is pretty straightforward:
uv run python ../datasets/get_dataset.py --dataset_id DATASET_ID --type train --format gpt --output traing.json --img_folder train_images --workspace_id WORKSPACE_ID --api_token API_TOKEN

INFO Dataset 'Real Estate IT for LLM' loaded (system_prompt=True, result_template=True)
INFO Exporting 1 sample(s) [type=train]
train:gpt: 100%|███████████████████████████████████████████| 1/1 [00:00<00:00,  2.68it/s]
INFO Done. wrote 1 record(s) to traing.json (succeeded=1 skipped=0 failed=0)
Choosing an Export Format
This script is able to generate files in two different formats. One is HuggingFace/TRL where the output is a JSON array; image is a {"type":"image"} placeholder + a parallel top-level images list:
  [
    {
      "messages": [
        {"role": "system", "content": [{"type": "text", "text": "You are a detector."}]},
        {"role": "user", "content": [
          {"type": "image"},
          {"type": "text", "text": "Locate: the small white plane"}
        ]},
        {"role": "assistant", "content": [
          {"type": "text", "text": "[{\"label\": \"plane\", \"bbox\": [0.1, 0.2, 0.3,
  0.4]}]"}
        ]}
      ],
      "images": ["train_images/0001.jpg"]
    }
  ]
This HuggingFace/TRL-style format works well if you’re fine-tuning open source LLMs such as Llama or smaller 7B-parameter checkpoints, especially with parameter-efficient fine-tuning methods like Low-Rank Adaptation (LoRA).
The other is --format gpt (OpenAI). Output is JSONL (one line per example); image is an image_url block; assistant content is a plain string:
  {"messages": [
    {"role": "system", "content": "You are a detector."},
    {"role": "user", "content": [
      {"type": "text", "text": "Locate: the small white plane"},
      {"type": "image_url", "image_url": {"url": "train_images/0001.jpg"}}
    ]},
    {"role": "assistant", "content": "[{\"label\": \"plane\", \"bbox\": [0.1, 0.2, 0.3,
  0.4]}]"}
  ]}
This JSONL format matches what GPT-4-class models expect for supervised fine-tuning. Once exported, this data is ready for fine-tuning – whether you’re adapting a pre-trained LLM for the first time or starting from a fresh base model.
From Dataset to Fine-Tuned Model
And that’s it – you’ve built your first instruction dataset in Ximilar. We defined a Result Template, created typed variables for our real estate agent, and added fully labelled samples with images, instructions, and training/testing flags. From here, the workflow scales: you can keep adding samples manually for full control, or automate uploads via the API once your format is locked in.
A high-quality fine-tuning dataset is the foundation of every well-performing model, and now you have a repeatable way to build and maintain one. Whether this is your first LLM fine-tuning project or your tenth, the same structured approach applies.
As you can see, Ximilar doesn’t just let you fine-tune large vision-language models – it also gives you a structured way to build a high-quality dataset for LLM training. This same workflow applies to LLMs just as well as VLMs. Whether you’re fine-tuning models for text or multimodal ones for images, the process of defining prompts and templates stays the same.

Related Articles

Wake Up, Collector: Cyberpunk TCG Card Recognition Is Here
Ximilar’s card AI now recognises Cyberpunk TCG cards – name, set, and rarity from a single scan. Test it in the App, via API or the demo.
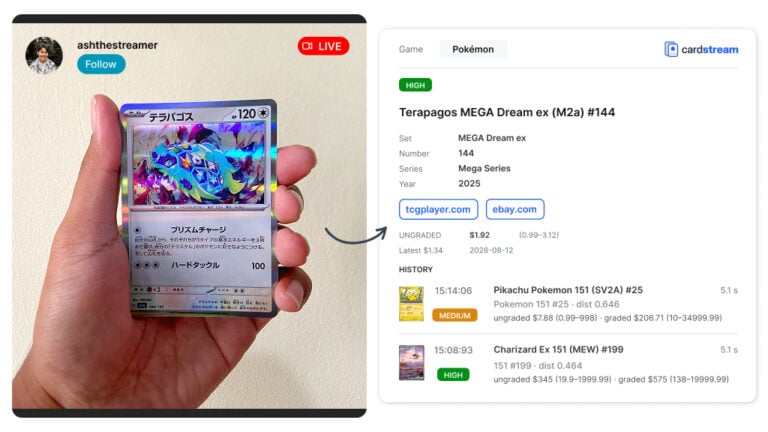
Cardstream: Open-Source Card Scanner for Live Streams
An open-source card scanner for live streams. Cardstream identifies TCGs like Pokémon and sports cards in real time from your video.
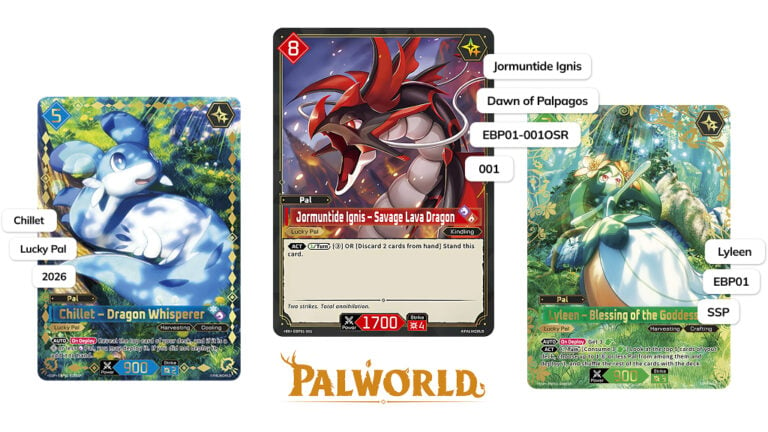
Recognize Every Palworld TCG Card in English and Japanese
Ximilar’s card AI now handles Palworld card recognition in English and Japanese, from a single scan. Test it in the App, via API or the demo.